Yes, it is real. If you haven’t been following the recent announcements about .Net openness, you have to believe that .Net core is open source and its available for linux and OS X as well. Check out this cool new site dot.net for knowing more about cross platform development using .Net. In this post, we will see how we can quickly get started with console app development in .Net that runs on a MAC.
Step 1 : Installing .Net core on MAC. These Setup instructions are a great way to install and bootstrap a new application using dotnet cli
Step 2 : IDE/Editor to write the awesome dotnet app. I personally use (recommend) Visual Studio Code on mac. Whether you are from a background of Visual Studio in windows or have been using other editors like Sublime, Atom, Brackets, Vim, etc., you should give it a try on VS Code. After installing VS Code, install the C# extension which comes with a lot of useful features.
Step 3 : Important commands to remember. With dotnet cli, its very easy to create a new app and get it up and running. Below are the basic commands which are required to start, build and run the app :
dotnet new - to create a simple Hello World app

dotnet restore - to restore the dependent packages

dotnet build - to build the app

dotnet run - to run the console app
Step 4 : Understanding the application code structure. To open the application in vs code editor run the following command by navigating to the root directory of your application
code .
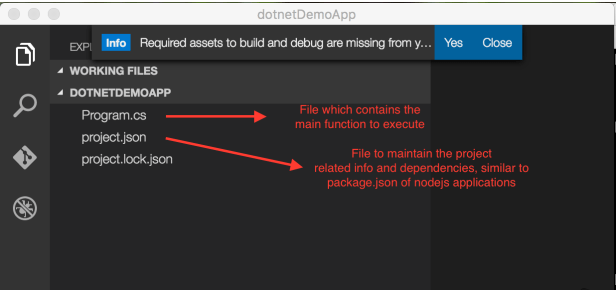
Once you open the app, vs code intelligently understands your dotnet application and gives you options to download the build and debug tools. If you wish to proceed further, you can click yes, otherwise close the dialog. Refer screenshot below
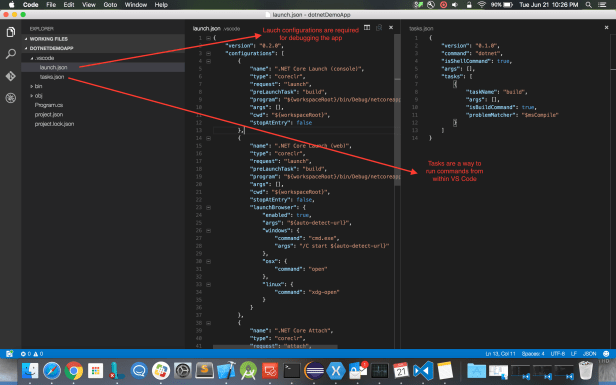
If you had selected “Yes“, you should be seeing two new files getting created under .vscode folder -> launch.json and tasks.json as shown in the screenshot below. We will get into the details of these two files later.
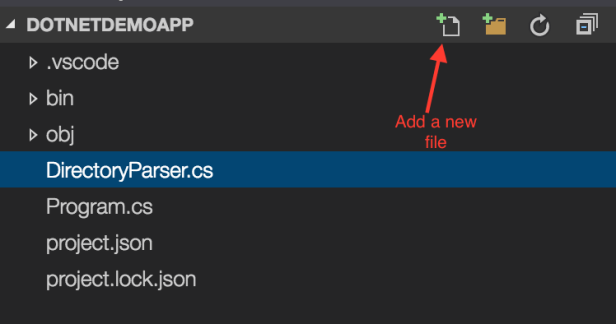
Step 5 : Adding new files, writing more code and executing the application. Running a Hello World app is a great start, but we definitely should advance ourselves with more coding. To make it little more easier to follow, I will add a new class, to perform the directory manipulation. One striking difference in the way dotnet core projects work compared to traditional .Net apps is that – the projects are managed at the folder level. Earlier versions of dotnet works based on .csproj/.sln files to manage the files present inside a project. Though you add files within a folder, unless you include them manually into a project/solution they will not be considered while building the project. With dotnet core, that process is no more, the moment you add any file into a project, they get considered automatically while building the project.
The contents of the new file added are as follows :
using System.IO;
using System.Linq;

namespace ConsoleApplication
{
public class DirectoryParser
{
public int GetSubdirectoriesCount(string directoryName)
{
DirectoryInfo di = new DirectoryInfo(directoryName);
var directoryCount = di.GetDirectories().Count();
foreach (var item in di.GetDirectories())
{
System.Console.WriteLine("Directory Name : "+ item);
}
return directoryCount;
}
}
}
Consume this class in main function as follows:
using System;

namespace ConsoleApplication
{
public class Program
{
static DirectoryParser dp = new DirectoryParser();
public static void Main(string[] args)
{
Console.WriteLine("Hello World!");
var directoryCount = dp.GetSubdirectoriesCount("/Users/z066157/SampleProjects");
System.Console.WriteLine("Number of sub directories : " + directoryCount);
}
}
}
Step 6 : Running the app and seeing the output. The console app can be built using the below command
dotnet build

Project dotnetDemoApp (.NETCoreApp,Version=v1.0) will be compiled because Input items added from last build
Compiling dotnetDemoApp for .NETCoreApp,Version=v1.0

Compilation succeeded.
    0 Warning(s)
    0 Error(s)

Time elapsed 00:00:03.3625175
Run the app using the below command
dotnet run

Project dotnetDemoApp (.NETCoreApp,Version=v1.0) was previously compiled. Skipping compilation.
Hello World!
Directory Name : appathon-demo
Directory Name : BowerSamples
Directory Name : CordovaSample
Directory Name : dotnetSamples
Directory Name : IonicSamples
Directory Name : MongoSamples
Directory Name : TacoCliSampels
Directory Name : watchOsSamples
Directory Name : XamarinSamples
Directory Name : YeomanSamples
Number of sub directories : 10
Step 7 : Pat on your back. Congratulations! You have successfully ran your first .net app on a mac machine.

It was great to read your post and it was really useful in helping me update my knowledge. Your article is also very well written. Keep up the good work! Thank you for sharing.
https://espirittech.com/dot-net-application-development-company/