In this post, we will see how we can quickly get a dotnet Web API running on a Mac. If you are not very well versed with what a Web API is, in simple terms its a dotnet based RESTful service. Before dotnet core it was NOT possible to run any web api services outside of Windows machine, as the hosting web server was only IIS. With dotnet core and Asp.Net core, this restriction is no more, any dotnet core app can be run on Windows/Linux/OSX. So, lets explore how we can get a new Web API up and running on a Mac.
Step 1 : Scaffolding a Web API Project
The primary advantage of being a dotnet developer is the tooling and the IDE Microsoft offers. With Visual Studio in place, you don’t have to worry about creating any type of dotnet project (web/windows/cross platform mobile app etc.,). But without Visual Studio on a mac, how should we create a new asp.net project. There are two ways (as of this writing ) to scaffold a new dotnet core/aspnet core application.
- Using Dotnet CLI
- Using Yeoman – scaffolding tool (popularly used for JS based frameworks)
In this sample, I am going to take the route of yeoman, as it has better options to scaffold a web api project. The default dotnet cli will scaffold a MVC application which will bring in unnecessarily extra files/modules not really required for Web API application.
Yeoman is distributed as npm package. To install yeoman, run the below command
npm install -g yo
Yeoman works based on generators – i.e., the modules that does the actual scaffolding. For our purpose, we need to use aspnet generator. To install that,
npm install -g generator-aspnet
Now, to create the web api project we require, run the below command
yo aspnet
This brings us with the option to select the type of asp.net project we want to create as shown below. Select the web API application as highlighted
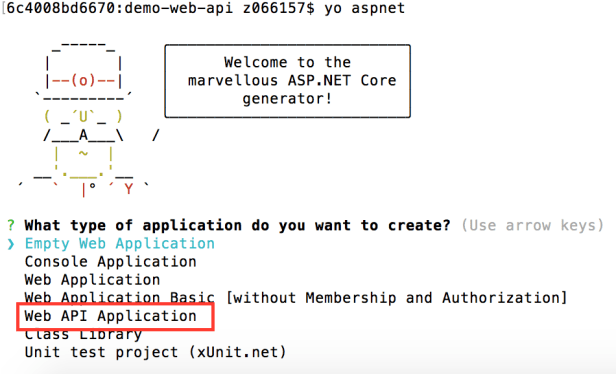
The output will look the one below:
? What type of application do you want to create? Web API Application
? What's the name of your ASP.NET application? demo-web-api
   create demo-web-api/.gitignore
   create demo-web-api/appsettings.json
   create demo-web-api/Dockerfile
   create demo-web-api/Startup.cs
   create demo-web-api/Program.cs
   create demo-web-api/project.json
   create demo-web-api/Properties/launchSettings.json
   create demo-web-api/Controllers/ValuesController.cs
   create demo-web-api/web.config
   create demo-web-api/README.md

Your project is now created, you can use the following commands to get going
    cd "demo-web-api"
    dotnet restore
    dotnet build (optional, build will also happen when it's run)
    dotnet run
Step 2 : Restoring the dependent packages
The web api project scaffolded would be dependent on multiple other libraries which can be pulled from Nuget. Nuget is the package manager for dotnet libraries. This can be done by running the below command from the root directory of the project.
dotnet restore

Restoring packages for /Users/z066157/SampleProjects/dotnetSamples/sample-webapi/demo-web-api/project.json...

Restoring packages for tool 'Microsoft.AspNetCore.Server.IISIntegration.Tools' in /Users/z066157/SampleProjects/dotnetSamples/sample-webapi/demo-web-api/project.json...

Writing lock file to disk. Path: /Users/z066157/SampleProjects/dotnetSamples/sample-webapi/demo-web-api/project.lock.json

/Users/z066157/SampleProjects/dotnetSamples/sample-webapi/demo-web-api/project.json

Restore completed in 4759ms.
Step 3 : Running the application
Once the dependent packages are restored, we can run the application by using the below command
dotnet run

Project demo-web-api (.NETCoreApp,Version=v1.0) will be compiled because expected outputs are missing

Compiling demo-web-api for .NETCoreApp,Version=v1.0

Compilation succeeded.

0 Warning(s)

0 Error(s)

Time elapsed 00:00:01.3587083

Hosting environment: Production

Content root path: /Users/z066157/SampleProjects/dotnetSamples/sample-webapi/demo-web-api

Now listening on: http://localhost:5000

Application started. Press Ctrl+C to shut down.
As you can see in the last two lines, the app is hosted under a webserver and running at the port 5000.
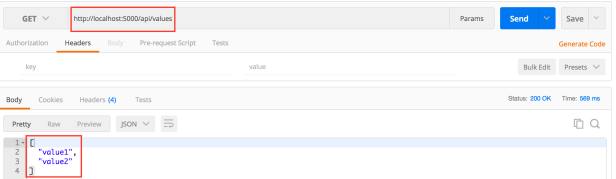
Step 4 : Triggering the api
The scaffolded project creates a single controller called ValuesController which exposes a few get/post/put/delete methods. To invoke the get method, from any rest client, hit the url http://localhost:5000/api/values
Step 5 : Understanding the project structure
This should have been the second step after we scaffolded the project, but I just changed the order to first see the output and then analyze the code. Since there is no Visual Studio for non-windows platforms, you are free to use any editor of your choice (Atom/Sublime/Vim/Emacs etc.,) I personally use VS Code. To open the project in VS Code, from the root folder for the project type code .
The project will have the below set of folders and files within it.
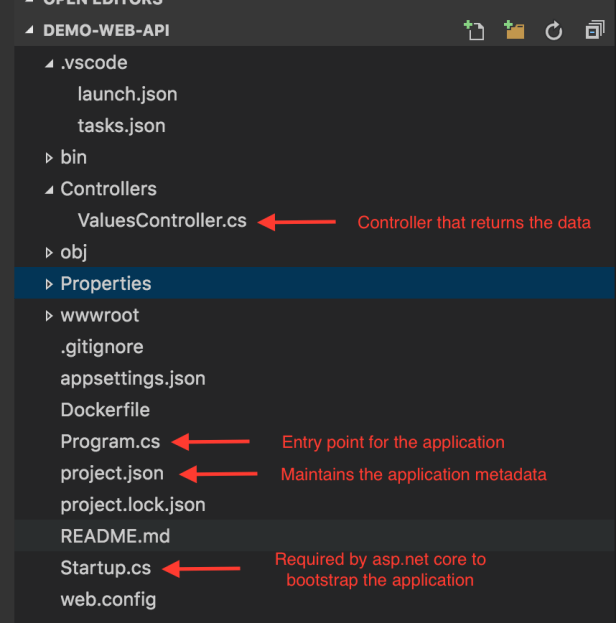
The annotated files are the primary ones that we should know of. The launch.json and tasks.json are VS Code specific ones that help in debugging and executing the tasks like build, test etc., To debug the dotnet core/asp.net core apps using VS Code refer to my earlier post.
Some gotchas on asp.net core web api :
- Where is this app hosted as there is no IIS on MAC ?
- The asp.net core application are hosted under a web server called
Kestrel
- The asp.net core application are hosted under a web server called
- How do I change the default port of 5000 ?
- To change the default port of 5000, add the following line of code to the WebHostBuilder fluent API code
.UseUrls("http://localhost:5001/") - If you would like to give the port dynamically while running the app, run the app using below arguments
dotnet run --server.urls=http://localhost:5001/
- To change the default port of 5000, add the following line of code to the WebHostBuilder fluent API code
- What is the default routing that is used ?
- By default, asp.net core apps following attribute routing. i.e., the route that resolves to API methods are defined as attributes to individual Api methods. As the below attribute indicates, any route with
api/valueswill resolve to the methods in this controller
- By default, asp.net core apps following attribute routing. i.e., the route that resolves to API methods are defined as attributes to individual Api methods. As the below attribute indicates, any route with
[Route("api/[controller]")]
public class ValuesController : Controller
That’s pretty much it for running the first app 🙂 More details on asp.net core web apps in future posts.

Nice Post to a jump start. Great Work Swami.
Good one.
This is very educational content and written well for a change. It’s nice to see that some people still understand how to write a quality post! onohosting
Thank you for wrriting this