Continuous Integration and Continuous Delivery are prevalent in the industry for quite some time, but with the recent buzz created by DevOps, CI/CD is becoming an integral part of every software development process. DevOps brings in a lot of new perspectives and tooling to automate software delivery processes and containers are one of them. When you think of containers, the natural choice these days are Docker. In this post, I will guide you through in creating a simple CI workflow for deploying ASP.Net core apps to Docker containers. Since ASP.Net core is a cross platform f/w, any application that is created with Micro Services Architecture using it, can be run in linux based Docker containers. In case you are not very familiar with Docker, I recommend going through their official documentation to get up to speed with the technology and concepts behind it. Also refer my earlier posts on Running your first asp.net core apps in Docker and Building Docker Images for asp.net core apps as this post will stitch all of them together and create a container DevOps workflow.
A typical containerized CI workflow would look like the one given below:
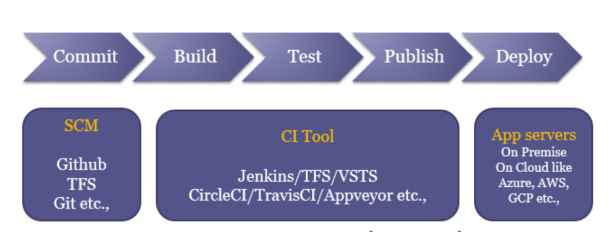
As you can see, Publish is a new step that got added to the traditional workflow of Build -> Test -> Deploy. From the tooling perspective, below are the ones which I will be using for this post. Feel free to use your preferred tool of choice.
Source Control Management :
I will be using Github as the source control management. Github is one of the most popular SCM tools and its completely free to have as many public repos as possible. If you are working with an Enterprise Git, the steps I use in this post, should work as is for that as well.
Continuous Integration Tool :
I will be using Jenkins as the CI tool for this post. Jenkins is one of the most popular CI tools that works with the concept of plugins. It’s free and easy to create jobs (builds). You can use a local instance of Jenkins/a common enterprise Jenkins instance.
Docker Hosts:
I will be using Linux based Azure VMs which has Docker installed in them as Docker hosts. The beauty of Docker is that, you don’t need to have Docker engine running locally in your machine to perform any docker related operations. All you need is the Docker client running in your local machine and you can connect to a remote docker host. This way you can have one common remote machine running a docker engine as build agent and all the clients can talk to this host to run docker commands like build, publish docker images etc.,
Prerequisites
I have used Azure based Jenkins + 2 Azure based Linux VMs (1 for building docker images and other for running docker images within containers). If you are working in an enterprise environment, you could use enterprise Jenkins and a common docker host made available for firing docker builds. To deploy the image in a docker container, you could install Docker engine in your designated dev/test servers.
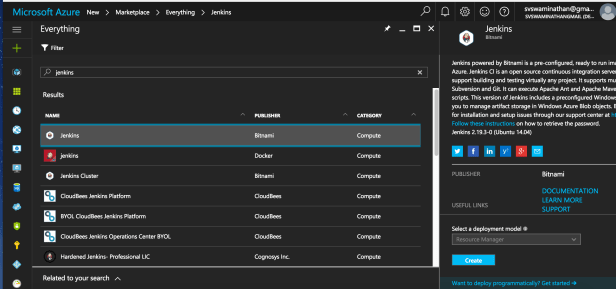
Step 1 : Setup Jenkins instance
The easiest way to get a Jenkins instance (with a docker client installed in it) up and running is to use Bitnami Jenkins image available in Azure. The screenshot below shows the steps in creating a Jenkins image in Azure
Follow through the steps provided by the next set of blades and create the VM with Jenkins running in it.
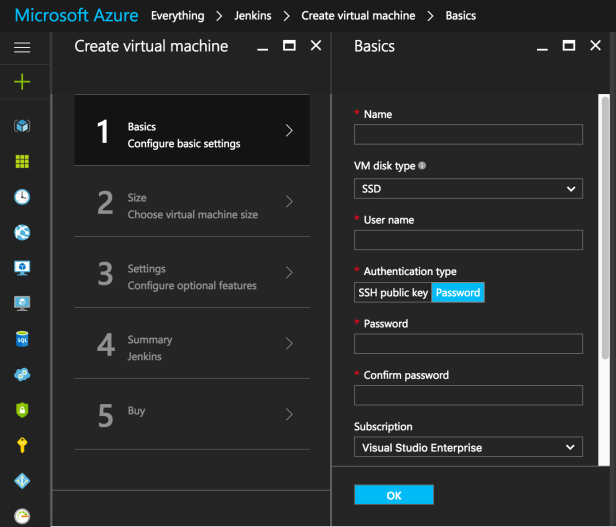
I have selected username and password combination to login to this linux VM. You could either use credentials based login or SSH based. Once Azure completes the deployment of this new VM, make a note of the IP address which we need to access this instance.
When you access this Jenkins instance for the first time, you will be thrown with the login page. Follow the instructions in this official Bitnami documentation page (https://docs.bitnami.com/azure/faq/#find_credentials) to retrieve the credentials for the instance which just got created.
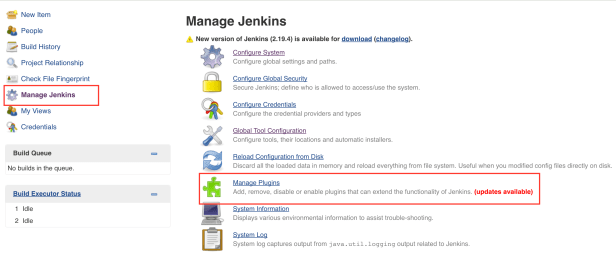
Step 2 : Install required plugins
Once you login to the instance for the first time, you will be thrown with the option to either install all the recommended plugins or customize the installation of plugins by selecting them manually. Once that’s complete, Click on Manage Jenkins -> Manage Plugins as shown in the pic below to install the plugins required to accomplish our tasks.
Below are the plugins that I have installed
- Github Plugin – to integrate Jenkins with Github
- Cloudbees Docker Build and Publish Plugin – To build docker and publish images
- Managed Scripts plugin – To trigger some bash scripts
Step 3 : Create a remote docker host that accepts docker commands
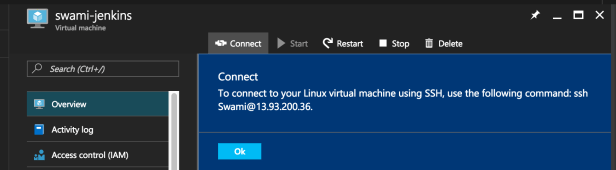
Now that we have Jenkins instance ready, next up is to create a remote docker host to which we can connect from the Jenkins job and do the build and publish of docker images. To do this, I will be using docker-machine which allows us to create remote docker hosts. If you are on Mac, open terminal and connect to the Jenkins machine. If you are on windows, download “putty.exe” and then connect to the Jenkins machine via putty. Connection details can be fetched from Azure portal as shown in the figure below.
From the terminal/putty fire the below commands
docker-machine version – this should display the version of docker-machine installed in the VM. If this command returns error, then docker-machine is not installed in the VM. Refer the official documentation and install docker-machine. Once installed, run the below command to create a remote docker host in Azure
docker-machine create -d azure
--azure-subscription-id {Azure Subscription ID}
--azure-open-port 80
--azure-resource-group {resource group name}
{vm name in all lowercase}
The above command should take a min or two to complete and create the Azure VM. To check if the docker-machine was created successfully, fire the below commands.
bitnami@swami-jenkins:~$ docker-machine ls

NAME  ACTIVE DRIVER STATE URL SWARM DOCKER ERRORS
mydockerhost - azure Running tcp://13.91.92.251:2376   v1.12.3
I had given my VM name as “mydockerhost” while creation and that’s what the command returns. To get to know the details to be used to connect to the docker host, fire the below command
bitnami@swami-jenkins:~$ docker-machine env mydockerhost
export DOCKER_TLS_VERIFY="1"
export DOCKER_HOST="tcp://13.91.92.251:2376"
export DOCKER_CERT_PATH="/home/Swami/.docker/machine/machines/mydockerhost"
export DOCKER_MACHINE_NAME="mydockerhost"
# Run this command to configure your shell:
# eval $(docker-machine env mydockerhost)
As you can see from the output, the docker-machine create command has done most of the required steps for us and our docker host is up and running at port 2376. The last line of the output shows how to setup the shell to connect to the machine. You can run through that and then start typing docker commands to see how it works. Make a note of the machine IP address as that’s required for us to configure our job.
Step 4 : Create a Linux VM to run the containers
Next up is to get a linux VM where we can deploy the asp.net core application. With Docker containers there is a significant change in the way application deployment is done.
We don’t deploy/ship applications, rather we ship images. Images are self contained i.e, the asp.net core application with all its necessary dependencies for it to run are baked into an image. So, once the application works in one environment, its guaranteed to work in every other environment it gets deployed.
To deploy the built docker image to containers, I have created another linux VM using docker-machine command like before. To keep things very simple, I created a new remote docker machine from the user id under which the Jenkins job would be running. To switch to a different user, fire the below command
bitnami@swami-jenkins:~$ sudo su - tomcat
tomcat@swami-jenkins:~$ docker-machine ls
NAME ACTIVE DRIVER URL SWARM  DOCKER ERRORS
mydockerhost-jenkins  -azure Running  tcp://168.61.10.241:2376 v1.12.3
tomcat@swami-jenkins:~$
With this, the infrastructure is ready for CI. To recap quickly, I have created the below set of things
- Jenkins instance
- Remote docker host to build and publish docker images
- Remote docker host to run the docker images
Step 5 : Create the Jenkins job
I used Freestyle job and created the Jenkins job.
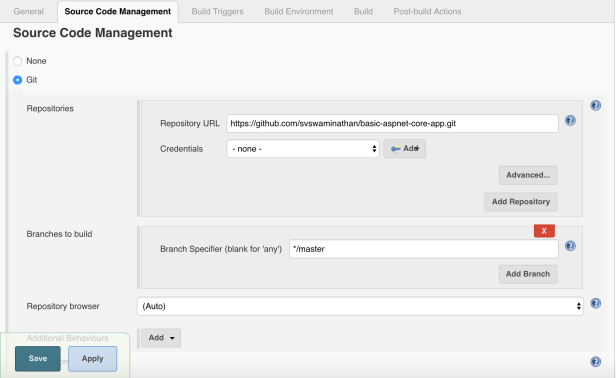
Step 5.1 Select Git under SCM and provide the desired GitHub repo URL
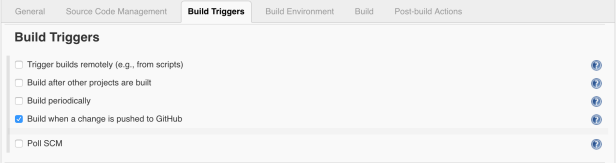
Step 5.2 Set Build Triggers to enable CI builds on every commit
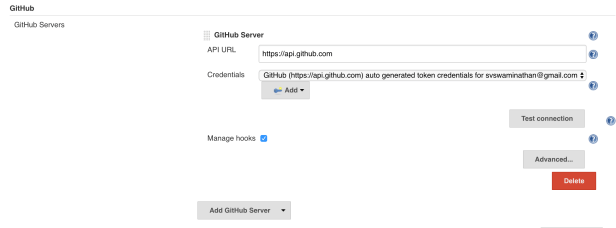
To trigger the builds on every commit in your github repo, you need to enable WebHooks in the repo. This can be done in two ways, either by going to repo settings in Github portal and adding the jenkins instance under WebHooks, or by adding Github Server in Jenkins itself. I followed the latter approach. To accomplish this from Jenkins, Go to Manage Jenkins -> Configure System -> GitHub. Add a new GitHub Server as shown below and provide your GitHub credentials to auto generate token.
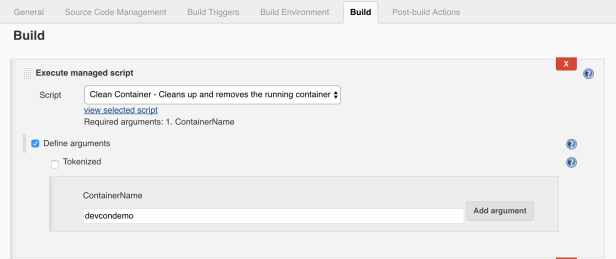
Step 5.3 Add Build Step – Execute Managed Script
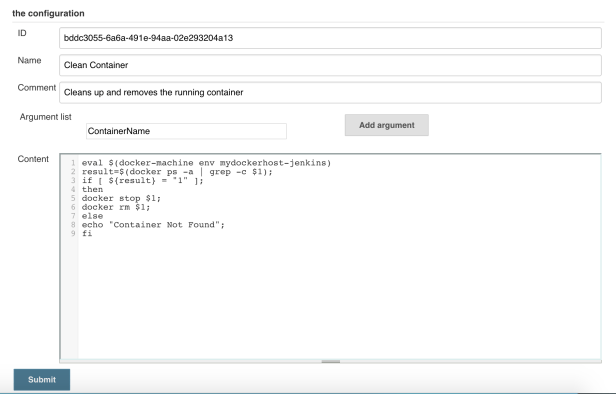
This step is provided by the Managed Script plugin, for this to work, you need to first create the script that you want to run. To create script,
Click Manage Jenkins -> Manage Files -> Managed Script File and add the below script
eval $(docker-machine env mydockerhost-jenkins)
result=$(docker ps -a | grep -c $1);
if [ ${result} = "1" ];
then
docker stop $1;
docker rm $1;
else
echo "Container Not Found";
fi
This is a very simple bash script to check if the container is already running or not, if its running, stop it and remove, else do nothing.
After adding the above script, when you add the build step in the job, you should get the options as shown below in the screenshot.
Step 5.4 Add Build Step – Docker Build and Publish
This is the key step in the build process. The options are thrown by the Cloudbees plugin.
- The repo name is the destination image that gets created. Image name generally follows this format /. The reponame would be your User name in the docker registry(http://hub.docker.com). Anyone can sign up for a free account in docker registry.
- Note the configuration for Docker Host URI- this docker host is the one which we created in Step 3
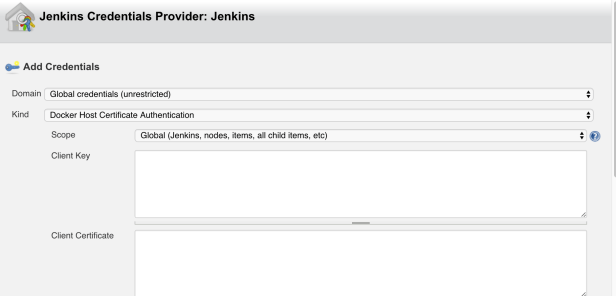
- Server Credentials need to be added once, Click on the Add button and that will give you the option to set the credentials in Jenkins as shown below.Navigate to the directory which contains the server and client certificates and copy the contents from appropriate certificate files and paste them accordingly.
- If you are using docker hub public registry, you can leave the Docker registry empty.
- Add your credentials to connect to your docker registry and select them as Registry credentials
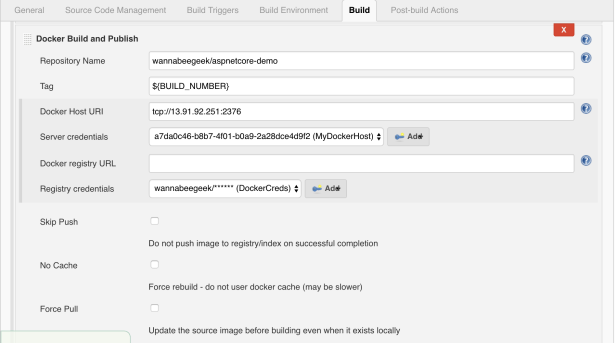
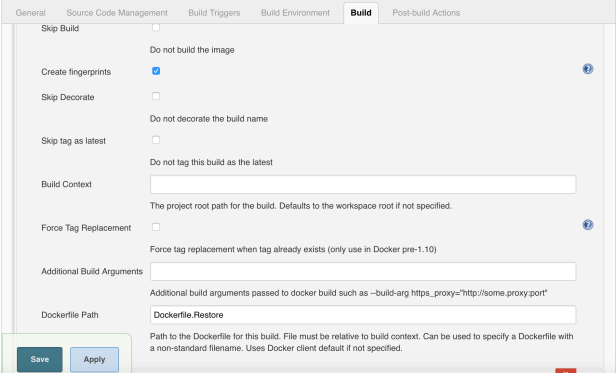
- Click on the Advanced button to toggle the advanced options. If your repo contains the Dockerfile in the name as just “Dockerfile” you can leave the
Dockerfile Pathproperty empty. In my case, I have named by Dockerfile as Dockerfile.Restore, hence specified it explicitly. This completes our docker build & publish build step
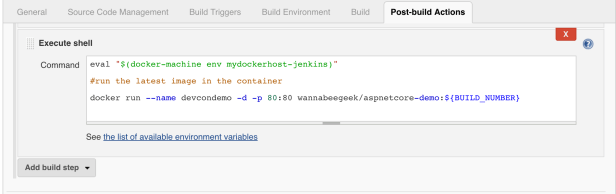
Step 5.5 Add Post Build Step – Execute Shell
To keep things very simple, I have used the Execute Shell step and running the application using the command shown in the screenshot. This would pull the image with the tag number specified by the currently executing build (the previous build step would have pushed that tag number to docker registry) and create a new container with that image, maps the port number 80 of the container with the host and run the image within the container. Once this step completes, you should be able to see the changes you made to the code getting reflected in the built application.
That’s it! Our CI pipeline is ready 🙂 If you push any commits to the repo you have specified under SCM configuration, you should see this build getting triggered, publishing a new version of the Docker image under your docker registry repo, and running the latest image in a container.
The demo codebase with Dockerfile I used in this post is available at :
https://github.com/svswaminathan/basic-aspnet-core-app
This is a very simplistic and minimalistic approach in creating a CI pipeline for Dockerized ASP.Net core applications. For more complex scenarios there are a lot of options available in Azure like Azure Container Service that provides entire infrastructure for deploying container workloads. More on those in a future blog post!
