Ionicframework has been my all time favorite for hybrid mobile app development, I have been using it since its pre 1.0 beta days and the amount of maturity and growth it has undergone is absolutely stunning. With Ionic 3 release the framework provides lazy loading of different pages inherently. In this blog post, let’s see how we can leverage the lazy loading for the hybrid mobile apps.
What is lazy loading ?
In short – load the components as and when they are required instead of loading them without even needing them. With Angular (2 & 4) creating more modular, highly scalable applications have become a lot easier. You can create different modules for different aspects or functionalities of the application and load them on the fly as and when user navigates to that portion of your app. That means for the portions which were never accessed by the user, the component doesn’t get loaded at all. This is really a great stuff, which angular provides out of the box. Though Ionic is built on top of Angular, the key difference between the two is the way Navigation is implemented. Since angular is primarily focused on the web, it uses URL based routing and since Ionic is primarily focused on the mobile, it follows the mobile app’s native way of navigation i.e, using Navigation stack – pushing and popping pages thus maintaining the navigation history out of the box.
Let’s understand how navigation works in Ionic with a basic demo app scaffolded using Ionic CLI. In case you have not installed ionic in your machine, you can do so by running npm install -g ionic The version of CLI I have used for this demo is v3.1.2
Step 1 : Create a blank ionic app
Creating a new app with Ionic is super easy. Open Command prompt or Terminal and type the following command, It should take about a minute or two and get you a new Ionic app based on blank template
ionic start ionic-multi-module-demo blank
Just to make sure the app is running fine, run the below command
ionic serve
Step 2 : Add buttons to trigger navigation
Locate the home.html page found under pages/home/ folder and modify the contents within ion-content
<ion-row>
<button (click)="navigateToAnotherModule()"ion-button color="primary">Load from Diff Module</button>
</ion-row>
<ion-row>
<button (click)="navigateToSameModule()"ion-button color="danger">Load from Same Module</button>;
</ion-row>
Step 3 : Add navigation methods in home.ts file
In the previous step, we have wired up two different methods for click event of button, let’s provide a dummy implementation of both of them now (will change these methods once we add actual pages to navigate to)
navigateToAnotherModule() {
console.log('Navigating to another module');
}
navigateToSameModule() {
console.log('navigating within same module');
}
Step 4 : Add a new page to navigate
Adding a new page in an Ionic app is again super easy with the help of Ionic CLI. Run the below command to add a new demo-page
ionic generate page demo-page
This should have created a new folder named demo-page under pages directory. The screenshot below shows the files which were generated as a result of the above command.
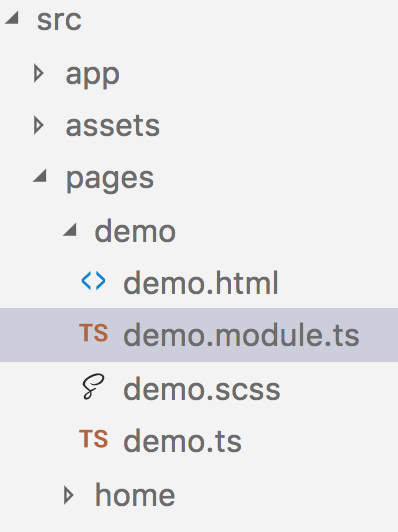
As you can see the HTML, SCSS, component files are scaffolded for us by Ionic CLI. There is also another new file called demo.module.ts which is nothing but a new Ionic page module. Ionic uses the concept of page modules to lazy load modules and the pages present within them. Let’s take a look at the code of the demo.module.ts file.
import { NgModule } from '@angular/core';
import { IonicPageModule } from 'ionic-angular';
import { DemoPage } from './demo';
@NgModule({
declarations: [
DemoPage,
],
imports: [
IonicPageModule.forChild(DemoPage),
],
exports: [
DemoPage
]
})
export class DemoPageModule {}
IonicPageModule.forChild(DemoPage) indicates Ionic that whenever someone tries to navigate to the demo page, this module needs to be lazy loaded. The wiring up doesn’t end here, the component (or the page in discussion) should also have supporting annotation. Let’s look at the component code from demo.ts file
import { Component } from '@angular/core';
import { IonicPage, NavController, NavParams } from 'ionic-angular';
@IonicPage()
@Component({
selector:'page-demo',
templateUrl:'demo.html',
})
export class DemoPage {
constructor(publicnavCtrl:NavController, publicnavParams:NavParams) {
}
ionViewDidLoad() {
console.log('ionViewDidLoad DemoPage');
}
}]
Notice the new annotation IonicPage() on top of the component. That’s important for any component to participate in lazy loading. The IonicPageModule can lazy load only the components that are annotated as IonicPage.
Step 5 : Wiring up the navigation
Now that we have another page created, let’s add code in the button click event handler to navigate to that page. Open home.ts file and add the below lines of code within the method navigateToAnotherModule
this.navCtrl.push('DemoPage');
The page to be navigated is mentioned as string in this case. By Default, the component name is provided as string value. If you would like to give some other name you can specify the same under IonicPage annotation and provide the same name for nav.push method.
@IonicPage({
name:'demo-page'
})
//rest of the component declaration follows
and in the navigateToAnotherModule method, we should use the same name as shown below:
this.navCtrl.push('demo-page');
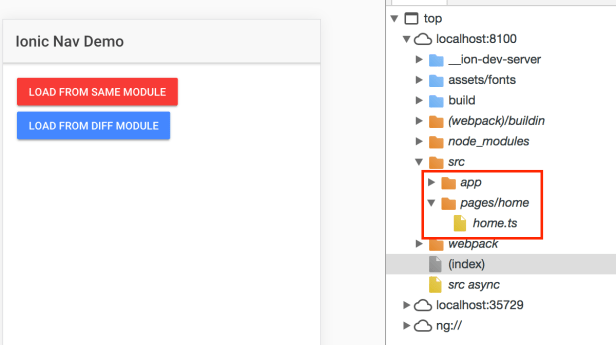
Step 6 : Testing the lazy loading
Run the command ionic serve to run the application in the browser. The below screenshot shows the snapshot of the source files that were loaded when the application bootstraps. The highlighted area indicates that only the home page is loaded.
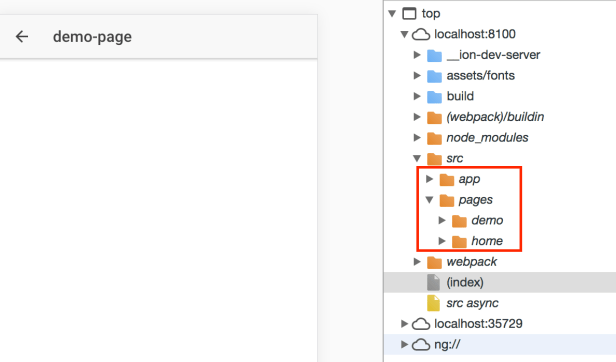
Click on the Load from Diff Module button to navigate to the demo-page we just wired up. The application should get navigated, alongside you should see the new page lazy loaded. The below screenshot shows the same.
Caveats :
As of this writing, Ionic doesn’t support having multiple pages within a single page module. i.e., Create one page as entry point for a module and then add more pages within the same module so that the navigation from the entry point page to others will not follow lazy loading. Either you can lazy load every page in your app by having them in their own individual modules or have the pages as a part of app.module.ts so that all the pages get loaded as and when the app bootstraps.
Turning off Lazy Loading :
If you feel there is no need to created individual modules for every page in the app you create, you can very well add the pages to the app.module.ts and get them loaded at once when the app bootstraps. Follow the below steps to achieve the same.
Run the below command to create a new page
ionic generate page demo-page-2
This should have created a new folder demo-page-2 under pages folder. Follow the below steps to add this new page as a part of app.module bootstrap process.
- Delete the file
demo-page-2.module.ts - Remove the annotation
@IonicPage()from thedemo-page-2.tsfile. - Import this file in
app.module.tsby adding the import statementimport { DemoPage_2Page } from '../pages/demo-page-2/demo-page-2'; - Add the DemoPage_2Page to the
declarationsarraydeclarations: [ MyApp, HomePage, DemoPage_2Page ], - Add the DemoPage_2Page to the
entryComponentsarrayentryComponents: [ MyApp, HomePage, DemoPage_2Page ] - Import DemoPage_2Page in the
home.tsfile and add navigation step in the methodnavigateToSameModuleimport { DemoPage_2Page } from '../demo-page-2/demo-page-2'; ... //rest of the component code ... navigateToSameModule() { console.log('navigating within same module'); this.navCtrl.push(DemoPage_2Page); }
Run the app now and you should be seeing the demo-page-2 also got loaded when the app bootstraps and the demo-page gets lazy loaded when the navigation is triggered. Screenshot below showing the same

Well, that’s how simple it is to implement Lazy Loading in an Ionic 3 app. If you are using Ionic 2, the Ionic CLI command wouldn’t generate pages as IonicPage with a new IonicPageModule for every page you create. You should follow the last few steps mentioned above to perform your navigation.
